Build your barre chords
Basics required for this lesson : How to read and play chords for beginners, Finding notes on the fretboard,
Practice this lesson : None
This tutorial focuses on the theory used in barre chords, and it explains in a simple way for beginners how to create your own barre chords.
Learning how to build your own barre chords is not a difficult thing, and it will be a lifesaver when you improve on your guitar playing. As a matter of fact, there are thousands of barre chords, one could almost consider that this is countless. Therefore, it's impossible to memorize them all by heart.
As a solution to that, one could always be carrying a chord dictionary, but this is not very convenient, and those are not always thorough. Learning how to build your chords will allow you to find out all the barre chords you want, when you want, with just some basic knowledge that's easy enough for beginners.
Let's split it all in three parts:
- the first part will dive into the subject and will cover a specific example that shows how to play a barre chord
- the second part will detail all the theoretical aspects involved. Once again, this is not very complicated and it's very useful
- the third part will deal with the most frequently used barre chords when beginning to play the guitar, and the fingering they require.
Once you master this discipline, you will be able to create literally any chord within a few seconds, with a bit of practice. You'll be ready to deal with the tutorial "barre chords for beginners", where we'll see how to work on them in a practical way.
Of course, this entire tutorial is optional, you can check out the tutorial "barre chords for beginners" without having gone through this tutorial, yet I strongly recommend that you check it out.
A first specific example
Let's dive immediately into the subject and see a specific example of creating a barre chord. However, it's compulsory to know one thing before starting off: open chords. First, because you will need them to create barre chords, and also because if you don't know yet what open chords are, barre chords will likely be too hard to play for you.
Our open chord
For our first example, let's start with a E chord (E major). Here's the grid as a reminder in case you don't know it by heart:

(If you're already struggling with this chord, don't get started on the barre chords now, come back later).
Mind the strings
But watch out, knowing how to play open chords is not enough: you must know them well. And by knowing them feel, I mean that you must know which strings are part of which chords. Some chords, some strings should not be strummed. It's really important to know that. If you don't follow these string matters, you will only make mistakes with barre chords. Luckily enough, for the E chord there is no issue, all strings need to be strummed, but be careful on other chords.
Use good grids
You also need to pay attention to the accuracy of the grids you use, some grids found online don't specify which strings need to be strummed, and will get you confused. When in doubt, feel free to check out our chord dictionary, all grids have been double-checked and they are accurate.
Let's go
To build our barre chord, let's start with checking out the chord grid, not the guitar. On this grid, let's pay attention to each note of the chord. When I say "note", I really mean note.It's not only about the fingers placed on the string frets, every string that's strummed, open or not, is going to make a note. In the E chord situation, there's a total of 6 notes: the lower E, B and high E open strings, the A string with fret #2, the D string with fret #2 and the G string with fret 1.
Let's shift the notes
So let's take each one of these 6 notes, and shift them all down the same amount of frets (i.e. towards the body of the guitar). Now, let's get back to our chord grid and shift each note down on fret. The strings that were previously open are now on fret #1, the strings that were fretted on fret #2 are now on fret #3, and the string that was fretted on fret #1 is now on fret #2. Here's the result:

We don't have enough fingers!
When we take a second look at this grid, we notice that there's a problem: there are six strings to fret, however we only have four fingers available on the left hand. And that's exactly what a barre chord is about: we are going to use a single finger. For this specific chord ( and for many many barre chords) the index finger will be used to fret the smallest frets. This means that it will have to fret the lower E string, the B string and the high E string, all three of them on fret 1#. So the index is going to press on all strings, so that they are all barred on fret #1. Our three other fingers will therefore be used to fret the three other notes that are part of the chord. This leads to the following fingering:

In practice, the symbol for a barre chord on a chord grid will usually be a thick line that looks like that:

To go further
If you just tried to play this chord at home, odds are you haven't managed to play it. A barre chord is something that's very hard to play the first times. Don't get discouraged, it just requires a bit of practice, and we will study that in the tutorial on barre chords for beginners.
In the meantime, let's not stop there. This concept can be extended further to what we just saw: this E chord can be shifted down more frets, say two, three or more frets. But we can also use another chord and shift it as well. But all this will happen in the second part.
Theoretical aspects
In this second part, we are going to try to understand, from a theoretical perspective, what we did in the first part. I told you in the beginning that you just needed to know the open chords, well now we need to master some additional prerequisites before we continue.
Prerequisites
Chord names
It may sound stupid, but you need to know the name of the open chords you are going to use. If not you won't know which barre chords you will be playing.
Notes on the fretboard
This is less important, but if you want to build your barre chords easily, you will need to know how to find the notes on the fretboard. It's not a big deal if you don't know them by heart, as long as you are able to find them without making (too many) mistakes. Feel free to check out our tutorial on notes on the fretboard.
Another option, if you don't feel like learning all this, is to use a chart listing notes on the fretboard.
Let's break down our open chords
To better understand what's going on when creating a barre chord, let's start with studying our open chords a little closer. We will not go too much into details in this tutorial, we will just see what's necessary to understand the mechanisms we are using.
A chord, no matter how complex it is, is defined by two things, the fundamental note and the nature of the chord, which we are going to study now.
The fundamental note
To make it simple, the fundamental note is the note that gives the chord its name. For an E minor chord, the fundamental note is an E. For a C major, the fundamental note is a C.
In most cases, the fundamental note will be the lowest note of the chord. Only inverted chords are specific cases, but we are not dealing with this for now. They are written in the form of Am/G, so if you come across those, don't apply what we are covering on that type of chord.
To find out what the fundamental note is, it's very simple: you just need to see which note is the lowest one within the chord. Watch out, that note is not necessarily located on the lower E string, as it's not always part of the chord. And watch out as well regarding which fret is being fretted, a note on the E string will not be an E if the string is not played open.
Start with looking at your open chords to find the fundamental note on them. You will notice that the E major and E minor chords have the same one. The thing that changes between these two chords is their nature.
The nature of a chord
The nature of a chord is something a little harder to define. In theory, we would have to go into quite complex details to explain all this correctly, so we will just try to make this accessible and we'll make this concept simple for now.
To make it simple, a chord is made of several notes. The gaps between these notes are what we call an intervals, and this set of intervals give us the nature of a chord.
A major chord will include a specific set of intervals, which will be different from a minor chord. All major chords have the same intervals, just the fundamental note varies.
In practice, the set of intervals can be defined by the "scheme" of the chord. If we look again at an E major grid:

We do have an E as a fundamental note, and other notes on the five other strings. The gap between the notes can be directly seen as a gap between the strings and the frets.
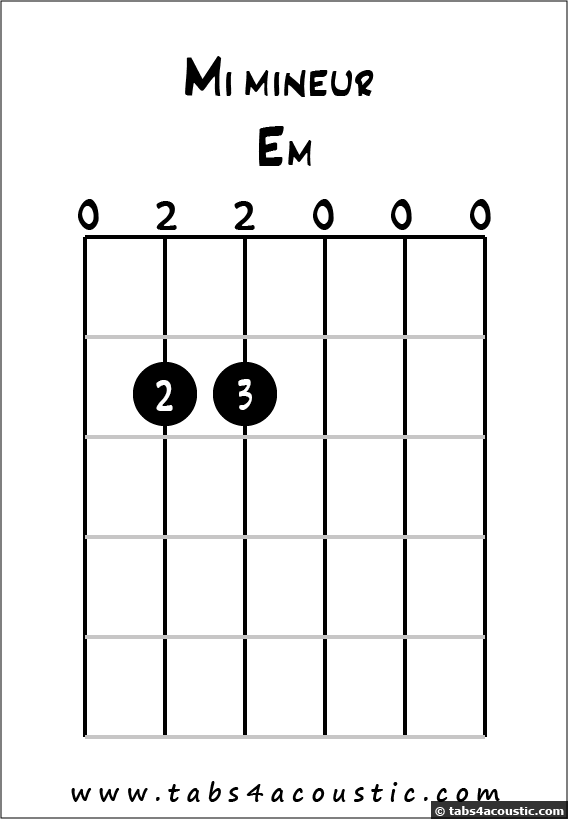
If we compare this grid with an E minor grid:
We can see that the fundamental note does not vary, but the other notes do. Not much, yet there is a difference. As a result, the set of intervals is different and the nature of the chord is different.
A brief Maths parenthesis
To sum up what we just said, a chord is made of a fundamental note and a set of intervals. In music, 12 notes can be potential fundamental notes: C, D, E, F, G, A, B, plus all the sharp and flat notes. Regarding natures of chords, there are dozens of them. There is no definitive list of all possible natures, since more can always be created.
So, if we consider that there are 50 natures of chords with 12 fundamental notes, we get a total of 600 possible chords. And this is far from the actual number. If we add to this the fact that there are several possible positions for each chord, it soon leads us to several thousands of possible chord positions.
So you understand that it won't be possible to learn them all by heart, and that it's better to know how to build your own barre chords. Thanks to what you are learning today, you will be able to use any chord position and make the nature of a chord vary on all the fundamental notes you want.
Let's bring it all together now
Let's get back to the example we saw in the first part and try to understand what we did.
We started with taking an E major chord, made of an E as a fundamental note and with a scheme corresponding to the nature of a major chord.
Then we shifted all notes down one fret. Therefore, the fundamental note is no longer an E, but the gap between notes didn't change, so the nature of the chord is still the same.

Now if we pay attention to our new fundamental note, it's the E string on fret 1, and this note is an F. So we end up having an F as a fundamental note and the nature of a major chord, therefore this is a F major.
Let's go further
Let's shift all this on other frets
This is a lot of fun, we took an E major and we shifted it to turn it into a F major. But we're not going to stop here : we can shift it down to other frets. This will lead us to other fundamental notes.
And if you think about it, since you can find any note you want on the E string, just shifting this E major position will allow you to play any major chord you want. You won't have to open your chord dictionary ever again to find the position for a major chord you don't know.
Let's use other chords
All this is fun, but what should we do for other natures of chords ? Well, you just need to take another chord, from another nature, and apply the same process. You can do that on all the chords you want to, open or not, and shift it to other fundamental notes. We will see the most common and most useful cases in the third part with their corresponding fingerings. But now you know that knowing barely ten open chords, with different natures of chords, will virtually give you access to all the chord positions you wish.
Two details to wrap it all up
We have covered most of what you need to know on barre chords, but there are still two important points worth stressing so that you avoid common mistakes for beginners.
Don't switch from a string to another!
When you start from a chord and shift it down, you must keep the notes on the same string. This is compulsory. If you transfer the position to other strings, it will modify the nature of the chord. So don't make mistakes, be very careful, especially in the beginning. The fundamental note must remain on the same string as the basic chord.
on't make mistakes
The whole process of creating your own barre chords is relatively complex, yet without being so difficult. There are many potential errors: you may play thee wrong string as you switch position, you may also play the wrong scheme, you may make a mistake as you are looking for the name of the fundamental note etc...
This mental exercise is not easy in the beginning, so go very very slowly, take all the time you need, and double-check everything at least three times. With some practice, you will be able to do all that in a few seconds. The less mistakes you will make in the beginning, the faster you will learn.
If you are having a hard time doing it on the guitar, feel free to do it on paper before trying to play the chords. Write the positions, shift them, figure out the fundamental note on paper before playing them. This will lower significantly risks to make errors.
To wrap it up
We have seen many things in this second part so, let's wrap up all these elements:
- start from an open chord position
- shift this position down a certain number of frets, while keeping the same scheme
- figure out the new fundamental note, keep the same nature of chord and find out the name of chord
It doesn't matter if you don't manage to play all these chords yet, what's important is that you master the concept.
The most common barre chords
Now that you understand how to proceed to build a barre chord, let's see in this part which are the most common positions. As stated earlier, there are thousands of different barre chord positions, but you don't need to know them all.
The most important ones
The chords you will come across most as a beginner (and even later), are major and minor chords. Thanks to them, you will be able to play thousands of songs immediately without having to learn other chord positions. Many of them are open chords, but you will need to add one or two barre chords very often.
So we are going to give a detailed explanation of how to obtain all the major and minor chord positions you will need, using all that we have just covered. And after this brief practice, you will be able to do the same thing on any other nature of chord you may need.
Four types of chords
Let's start with four open chords and generate all other barre chords from them. There will be two positions for major chords, E major and A major, and two positions for minor chords, E minor and A minor. Make sure you know these open chord positions well, if not you will struggle later.
A brief comment on these four types of chords: E major and E minor both have their fundamental note placed on the E string and A major and A minor both have their fundamental note placed on the A string. As a result, all the notes we will be figuring out in order to build our barre chords will be located on the E string or on the A string.
If you practice finding notes on the fretboard (following the advice given in this tutorial), focus on the two lowest strings. The other ones don't matter, for now.
E major and its derivatives
We already detailed that position in the previous part, so we will be brief. If we start from our E major chord and that we shift it down one fret, we'll get the following grid:

And since we end up with the fundamental note being on the first fret of the lower E string, it's a F. So we get a F major chord. This is by far the most common barre chord you will come across.
F# and Ab major are among the other chords we'll be playing using this position,. For F# major, it's the same as an F major, but shifted to fret #2, so we get:

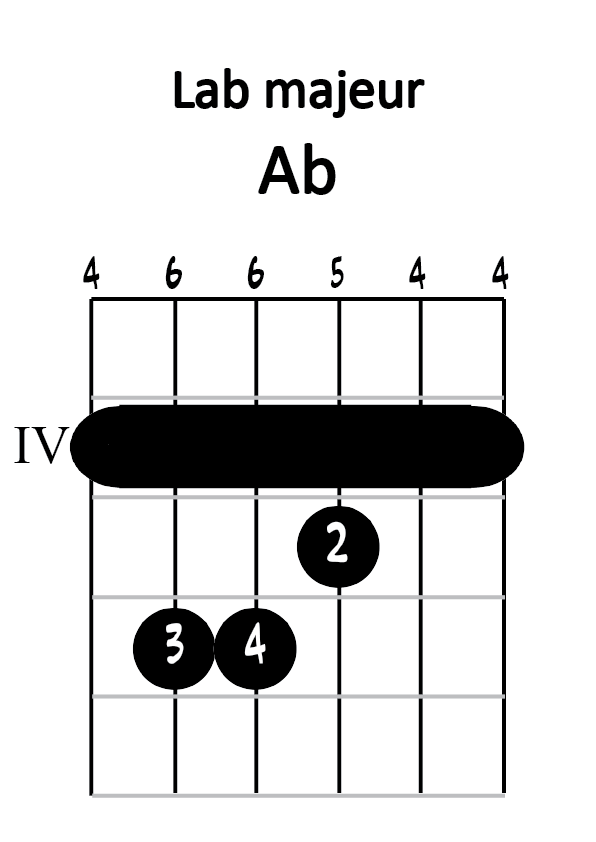
Ab will be located on fret #4 on the lower E string, so we'll get the following grid:
These are the three main chords based on this position that you'll come across in songs. The other chords, with much higher pitch, will be way less used and you'll see why a little later.
Please note the following interesting detail: if we start from our E major chord and we shift it down to fret #3, we get the following grid:

Which corresponds to a G major chord. This is the same chord as the one we know in open position, but it will sound slightly different. I won't get into details about the differences between these two positions, but be aware that you can use one or the other, as you like.
With the same process, we can figure out the A major chord, which is normally played open, but on fret #5 on the lower E string, with a E major position actually. This is what we get:

So, as we consider all these positions, we realize that we'll be playing the E major type quite often on the first five frets of the lower E string.
E minor and its derivatives
The E minor position is very similar to the E major position. The only difference being the index finger that's on or not on fret #1 on the G string.
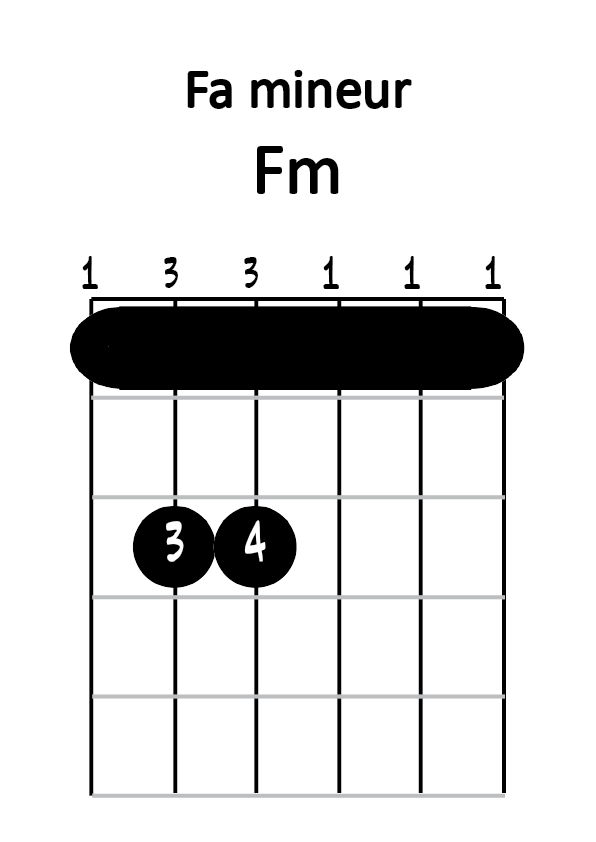
To shift it down to fret #1, it's always the same process, play a barre chord with the index on fret #1, then put the ring finger on the A string on fret #3, and the pinkie on the D string on fret #3 as well. And since we have a F as a fundamental note, this leads us to a F minor chord:
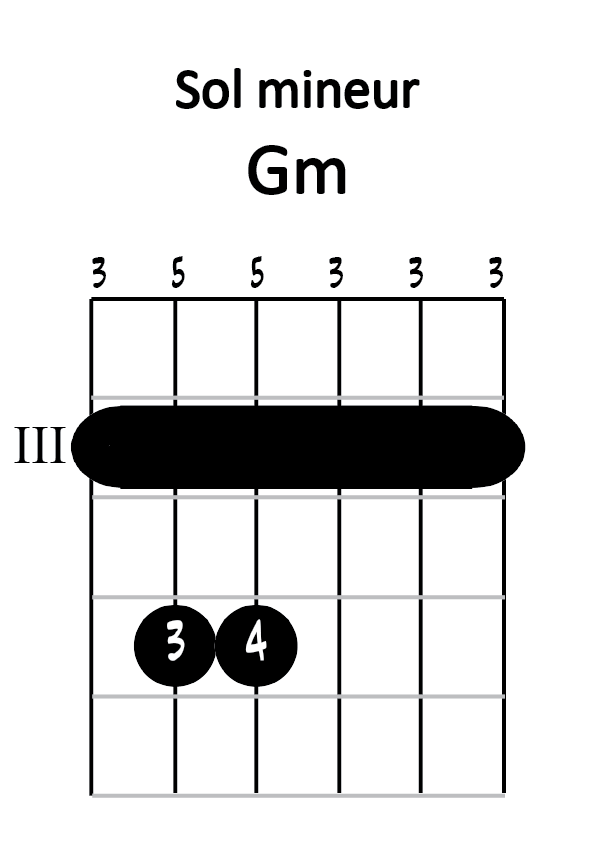
G minor is another very common chord that is based on the same type. To figure it out, you need to start with a G as a fundamental note, on fret #3 on the lower E string, and apply the same position. This is what you get:
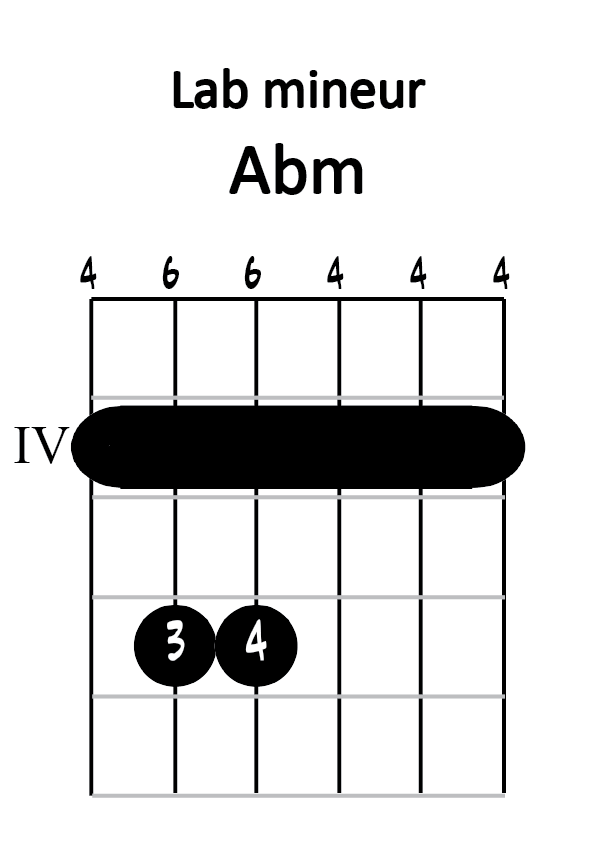
You will also come across F# minor and Ab minor occasionally, which are identical to the previous 2 chords, but on fret #2 and 4 respectively. This is what you get:
As for E major, you'll rarely go beyond fret #5 to play chords with a higher pitch.
A major and its derivatives
Watch out, A major is by far the hardest barre chord to play among those we are covering today. This won't be the position we use most, unfortunately we won't have any other option for some chords. So, let's get to it and with some practice it will turn out fine.
Don't forget, for A major, the fundamental note is located on the A string. When shifting our chords, we'll need to take into account the note that is on the A string to figure out its fundamental note. The lower E string is not part of the chord, we don't strum it, we act as if it did not exist.
B major is one of the chords for which we'll be using this position often. Let's start with the B on the A string, which will be located on fret #2, and shift the rest of the position. Watch out, in open A major, there is a two-fret gap between the fingers and the open strings, so if you shift your fingers appropriately, you will get the following position:

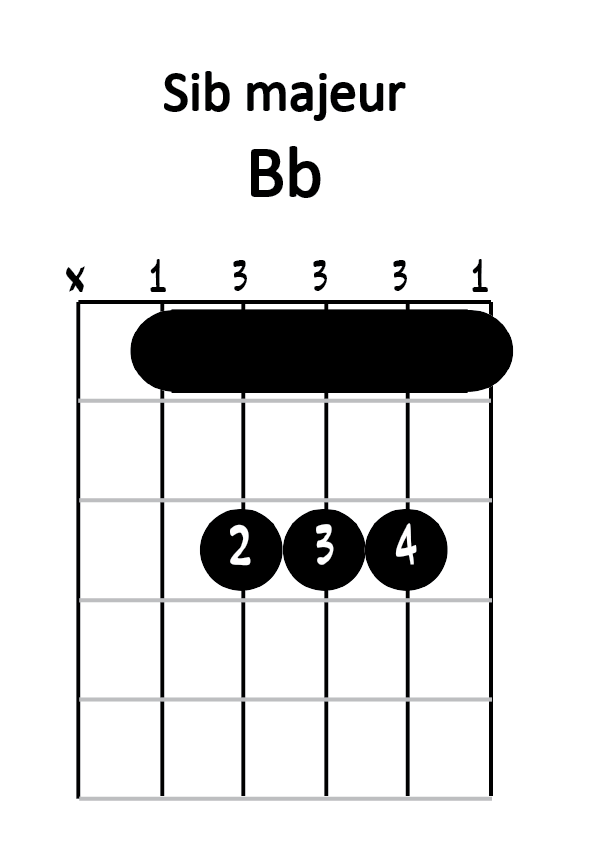
Bb major is another common use of this position. It's exactly the same thing as a B major but on fret #1. So we get the following:
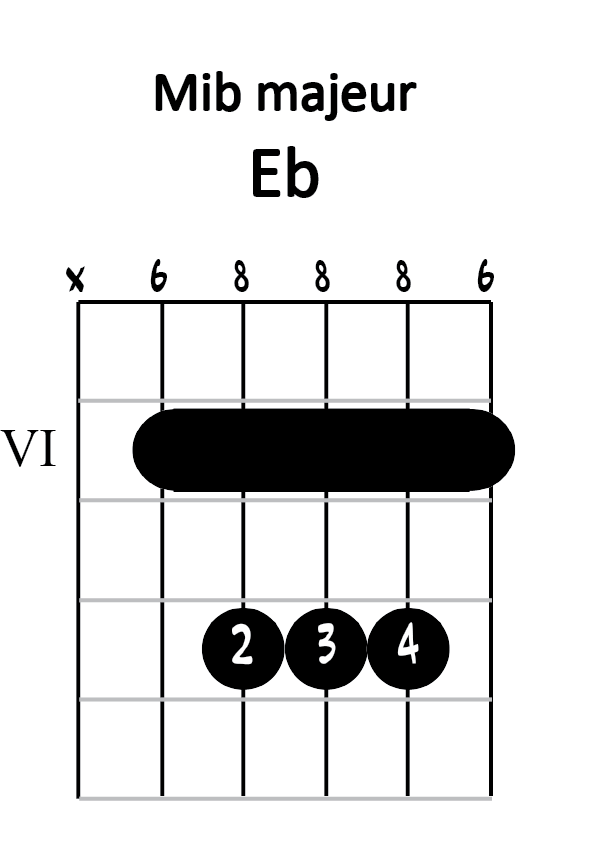
One last barre chord before we move on, and this one will be Eb major, which we come across quite often. To play it, you need to search where the Eb is on the A string, and you'll find it on fret #6. Let's apply our A major position, and we get the following:
Once again, this position is the hardest one to shift, so don't worry if you don't manage to do it in the beginning, this is normal. Practice and it will turn out fine.
A minor and its derivatives
This is the last position we will cover today, and as for the A major, the fundamental note is located on the A string. As for the previous position, pay attention to this detail.
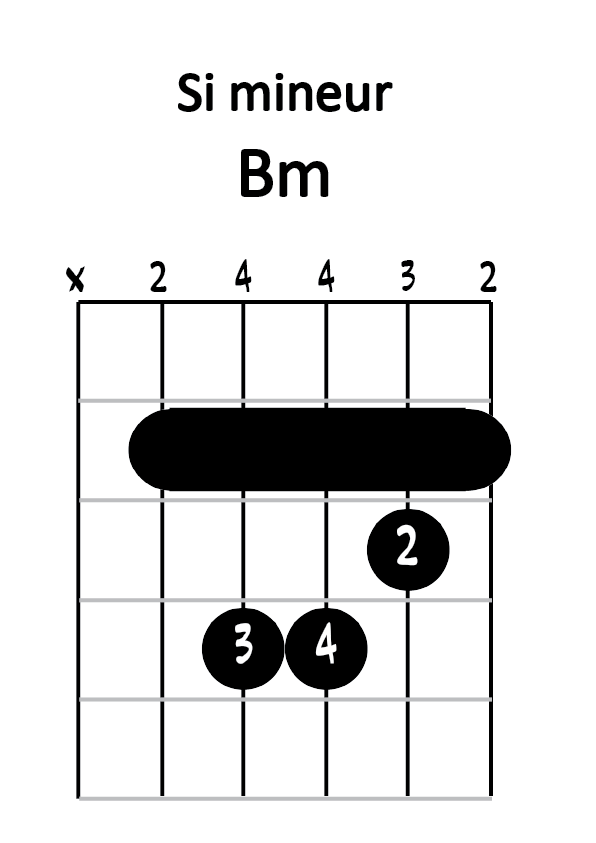
The most common chord that you need to know by heart is B minor. As for B major, B is located on fret #2 on the A string, it didn't move but this time we apply the A minor position rather than the major one, and we get the following:
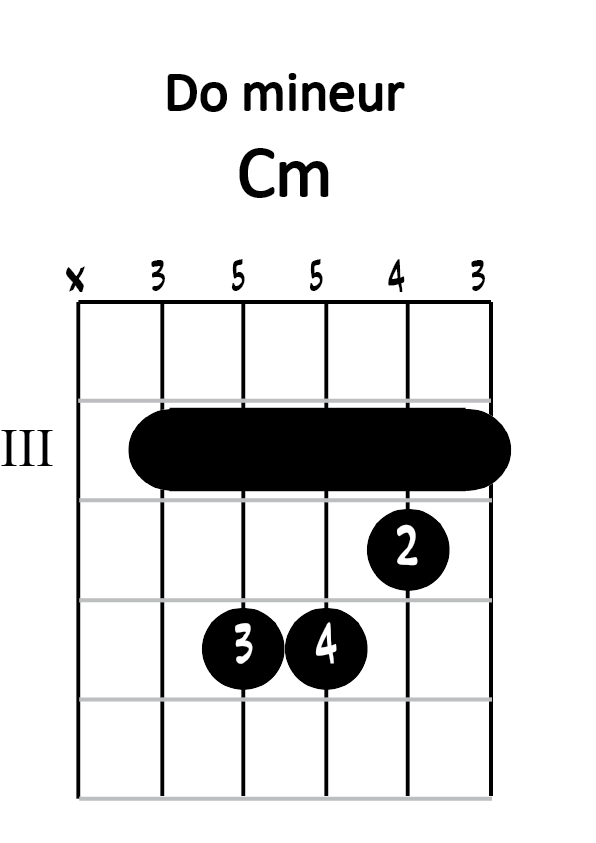
Another chord to know is C minor. We know how to play C major in open chord, but C minor will almost always be played with a barre chord. As the C note is located one half-tone up the B, it will be on fret #3 on the A string, and we'll just have to shift our B minor down on e fret to get:
One last chord to mention: D minor. Even though we know how to play it in open chord, we'll play it with a barre chord very often for a whole lot of reasons. In order to play it, it's always the same thing, start with the D on the A string, which will be located on fret #5, shift the chord position and you get the following:

Feel free to go further
Here are the main chords that you'll come across most of the time. This is not a complete list, you can play many more barre chords with these four basic positions. Our goal is just to show you the ones you'll come across most of the time, and to get you to practice a little bit finding the chord positions you need.
Sooner or later you will need to play a barre chord that you don't know, so that's important for you to be able to figure it out on your own. Feel free to use these positions on other frets, even though I said that we rarely go beyond frets 5-6, you can still do it, this is not forbidden, and it can even be essential sometimes.
Feel free to apply the same concepts on other open chord positions. I introduced you to these four ones today, because they are the most common ones, but you can do this on any other position, so feel free to experiment, it will help you practice. And if you're not sure about what you're doing, you can always join us on the forum to show us what you have done and will correct it if need be.
One last thing to mention
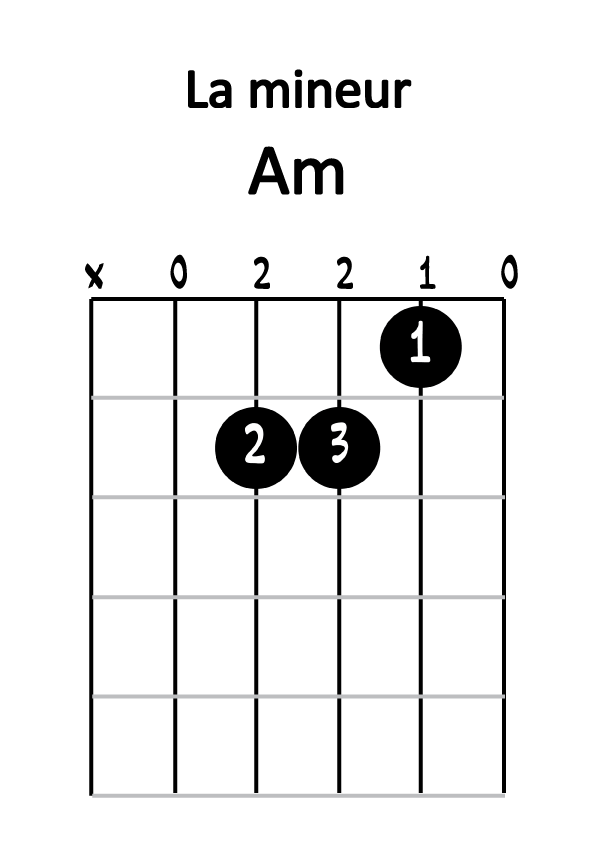
This is a tiny detail I wish to clarify to avoid any confusion. If we take a look at the E major and A minor grids:
We realize that the fingers have the same position but they are not on the same strings. So let me insist on this: when you shift an open chord to a barre, NEVER switch to other strings. If not, you major chord will turn into a minor chord, or conversely. be very careful about that, because it may lead you to make big mistakes.
To avoid any confusion, it's quite easy: if your fundamental note is on the E string, you use the E major or the E minor position. If your fundamental note is on the A string, use the A major or the A minor position.
Take your time
Don't rush your learning process of the barre chords. There are many things that can be confusing, that can lead you to making mistakes, so take your time. I strongly recommend that you work on all this with a paper and pen before you do it on the guitar. First, because if you are a beginner, you won't manage to make your barre chords sound properly, and this is frustrating, and second because you will make a lot of mistakes if you get your hands immediately on the guitar. Take time to go step by step on paper, think it through, do each step appropriately.
Once you feel comfortable, you can check out the tutorial on barre chords for beginners in order to acquire the technique that is required to make it all sound great.


